
LOGI-MARK1 Guide – Bitstream and Firmware Updates
The LOGI-Mark1 allows for drag and drop reprogramming on FPGA bitstream files and the onboard Cortex M3 LPC1343 firmware files. This tutorial will walk through the steps required to update the bitstreams for the FPGA or the firmware for the MCU.
Onboard Microcontroller
The LOGI-MARK1 has a built in bootloader that allows for easy updating of new firmware to the LPC1343 M3 Microcontroller.The onboard microcontroller allows for a great deal of flexibility and versatility in how the board operates.The main purpose of having the onboard microcontroller is to allow for easy drag and drop programming of the FPGA, which eliminates the need for an expensive programming adapter.The microcontroller has master control of the some of the FPGA configuration pins, which allows it to directly program the FPGA through a slave serial programming interface.Optionally, peripheral boards including the Beaglebone or Raspberry Pi can gain direct programming access to the FPGA.Additionally the microcontroller adds onboard functionality including 10 bit ADC, peripherals including SPI, UART, I2C and USB.These features allow for the low cost addition of a wide array of complementary features of the onboard FPGA.
Loading FPGA Bitstream
A bitstream programming file for the FPGA is created in theXilinx WebpackISE workspace.The FPGA project is synthesized and implemented and a bitstream file that can be loaded onto the FPGA is created.The General method of loading the bitstream file on to an FPGA is by using a JTAG programming adapter.The LOGI-MARK1 has eliminated the need for the JTAG programming adapter by using the onboard LPC1343 microcontroller as the bitstream loader.The microcontroller shows up as an MSD storage device on the PC that is being used to create the bitstream.The process for loading the bitstream onto the FPGA is as easy as dragging and dropping the renamed bitstream file onto the MSD storage device.The microcontroller then loads the bitstream in the flash memory for storage.The file is then loaded into the FPGA upon power cycles or resets of the microcontroller.Alternatively peripheral boards including the Beaglebone, Raspberry Pi and Arduino can send I2C commands to the microcontroller to reload the bitstream or to take over control of loading a bitstream into the FPGA.
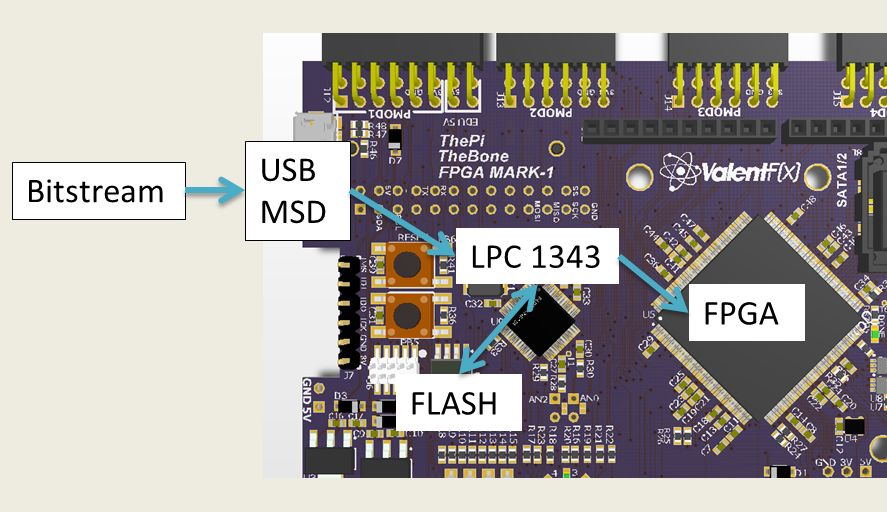
Process for loading a new Bistream
- 1) Create a new bit file from within Xilinx Webpack ISE or locate an existing bitstream file.
- 2) Rename the bitstream *.bit file to “config.bit”
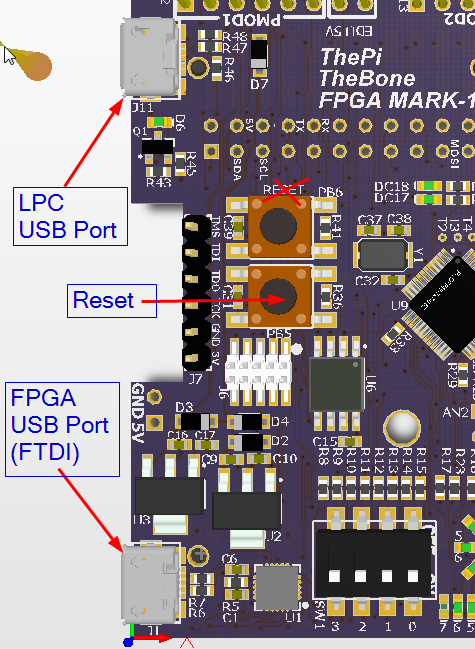
- 3) Using a micro USB cable, plug your host PC into the MARK-1 board's J11 connector. This connector gives you access to the LPC microcontroller on the MARK-1 board. This microcontroller has the capability of configuring the FPGA.
- 4) You should notice a new filesystem of around 2MB in capacity show up on your host pc (if yo are on Windows, you may have to wait for the appropriate drivers to be installed). It may contain a config.bit file. You may wish to backup this config.bit file to restore the MARK-1 to its factory bit file.Replace the “config.bit” file with the new renamed bitstream that you would like loaded onto the FPGA.
- 5) Press the Reset button (lower button PB5) to reset the microcontroller.Upon reset the microcontroller will load the new bitstream into the FPGA.LED DC17 will indicate that the bitstream is being loaded.The DONE LED near the FPGA will light upon being successfully loaded.
Bootloader
Custom firmware to add system functionality can be written and updated to the microcontroller by using the LPC1343 built in bootloader.The bootloader is built into the silicon, so there is no need to worry about bricking or losing device by inadvertanlty loading incorrectly linked firmware.Firmware can be easily written using LPCXpresso which is NXP’s free IDE.It is important to note the code support for base system operation including loading the FPGA must be maintained if it is desire to write user customized firmware.
Process to load custom firmware into the LPC:
- 1) Build custom firmware using LPCXpresso.Build custom application on top of the base application that supports loading the FPGA bitstream.A binary file (*.bin )will be created upon successfully building the project in LPCXpresso. The .bin file will be located in the “Debug” or Release” directories of the LPCXpresso project folder.
- 2) Rename the *.bin file to “firmware.bin”
- 3) Plug in a Micro-USB cable into the upper USB port on the LOGI-MARK1, J11. When plugged in the LPC1343 will enumerate as an MSD device.In order to enter bootloader mode press both PB5 and PB6 simultaneously.Let go of PB5 (lower Reset button) while still holding PB6.Note that the silkcreen incorrectly labels the top button as the Reset, the lower button PB5 is the reset button.A rolling motion with the finger while holding both of the buttons down is usually adequate, ie push both buttons with a single finer,roll off the reset while still holding the upper push button down.The upper pushbutton only needs to stay held down for a moment.
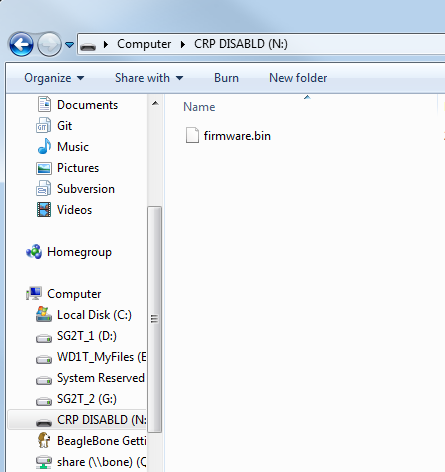
- 4) The device will now enumerate as an MSD device in bootloader mode.The Drive will be labeled “DRP DISABLED” .Open the drive once the drive has enumerated and shown up as a drive on your computer.You will see a file named “firmware.bin”.Delete this file and replace it with your newly built firmware file that you have renamed to “firmware.bin”.
- 5) Press the reset button after replacing the file.The LPC will now enumerate as an MSD in standard operation and the new firmware will be running.
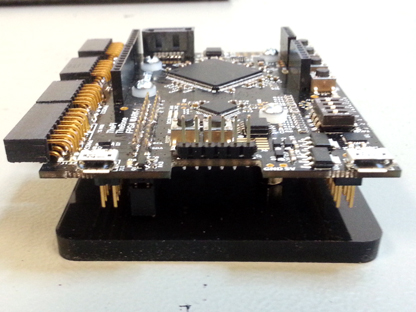
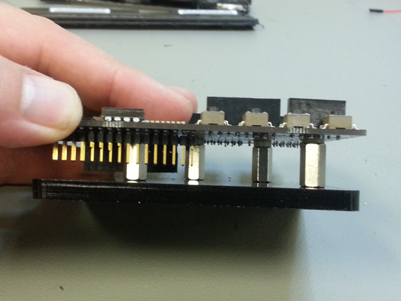
An acrylic base was designed for the LOGi-Mark1. The LOGi-Mark1 is designed to be used in multiple different environments including being used as an shield or expansion board for the Raspberry Pi, Beaglebone or Arduino. In order for the LOGi-Mark1 to work in all these environments expansion headers must be populated to interconnect to the respective embedded platform. When the headers are installed they protrude from the bottom of the board and expose many of the onboard signals. The headers and exposed signals would be placed directly on the surface without an alternative solution. This would make the LOGi-Mark1 difficult to use when it is not connected to an embedded host.
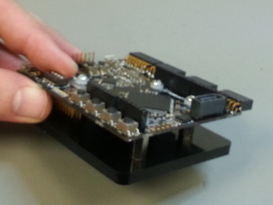
An acrylic base was designed to allow the LOGi-Mark1 to be used standalone mode while having the expansion headers poplulated. The Acrylic base uses the existing mounting holes and standoffs to create a supporting platform for the LOGi-Mark1. The standoffs allow the headers to be elevated removing potential for mechanical or electrical interference.
The Acrylic base was desgined using solidworks. Leah at MixedMangos.com kindly put her laser cutter to work to cut out the acrylic pieces. Some pictures of the installed acrylic base can be seen below.
The LOGI family is still in development and we are currently talking to distributors about carrying the boards. We have beta boards that being used to develop drivers,support code and examples. Some of the cool applications that we have developed to date can be found in the LOGi Blog. Please feel free to email us with input or feedback. We hope to have these in your hands soon!
If you are a distributor and are interested in carrying any or all of the LOGi family of boards please contact mjones@valentfx.com
Here's a hackaday writeup of the project. It's always nice be recognized. Great Work LOGi Team!
Foreword:
This project allows users to easily experiment with and discover the inner workings of mining on a low cost multi-purpose platform. Note that there are currently much faster and more powerful options available for bitcoin mining including FPGA arrays and ASICS. The purpose of the article and project is simply to introduce to the processes and algorithms used for bitcoin mining, not to make money. The knowlege, algorithms and processes can be taken to larger scale platforms if the user wishes to seriously pursue bitcoin mining
Bitcoin mining is part of the process in a bitcoin transaction. The transaction consists of some very hard number crunching. Bitcoin and Bitcoin mining topics go well beyond the scope of this article. Please have a look at the reference links available in the footer for more information regarding these complex topics. I will briefly explain in a very high level manner the process of bitcoin mining and show how and why it directly applies to FPGA’s, particularly the in conjunction with an embedded platform with web access such as the beaglebone or Raspberry Pi.
Bitcoin
So what is bitcoin? Bitcoin is an experimental, decentralized digital currency that enables instant payments to anyone, anywhere in the world. Bitcoin uses peer-to-peer technology to operate with no central authority: managing transactions and issuing money are carried out collectively by the network. Bitcoin is designed around the idea of using cryptography to control the creation and transfer of money, rather than relying on central authorities [1]. The more interesting aspects of bitcoin mining are in the details of the intricate protocols and algorithms being used that make up what is quickly being adopted as a new digital currency. Part of the beauty of the bitcoin protocol is that it uses technologies including encryption, hashing, client to client communication, all of which scream out for an FPGA implementation.
Mining
Most of the work involved in bitcoin transactions is in the mining. The key part of the transaction is in the verification process that authenticates the bitcoin transaction. The verification process awards effective bitcoin nodes (or "bitcoin miners") with a limited release of bitcoins and the transaction fees (if any). This process requires intense computing power, electricity, and significant investment as it solves hashes through brute-force to verify transactions and add them to the network's transaction log [1]. So part of the fun of mining is getting a reward equivalent to hard cash money! You might have noticed the words brute force and solving hashes. These are two more keywords that are just asking for an FPGA.
Algorithm
The process of bitcoin mining is no minor feat and this is why FPGA’s have been widely adopted for the task. The mining process, or proof-of-work process, involves scanning for a value that when hashed, such as with SHA-256, the hash begins with a number of zero bits. Once this hash has been found, the block can be considered as being solved and the transaction can be verified. The average work required is exponential in the number of zero bits required and can be verified by executing a single hash [2]. You can go through the links below to see more details about the processing, but the bottom line is that you are looking for a diamond in the rough. So, get to that number crunching, as the faster you crunch the numbers the sooner you will have a chance to wield that bitcoin cash earned by the work of that handy dandy FPGA.
The reality of solving a “block” or successfully mining the correct hash is becoming harder and harder with the advent of bigger and better processing work horses. The trend has gone from crunching the numbers on high end FPGA’s to now being able buy a custom ASIC which is designed to increase the total number of hashes/sec calculated while reducing the power requirement from that of running PC’s, GPU’s or FPGA’s. But this should not discourage you from getting started with an FPGA, as there are now pools of miner’s which all work together to solve the “block” and then share the loot with all who were working on it. So, even the humble 2.5 Mega hash/sec, as found in this project, can get you in the game. You will have bragging rights of be saying you did it, but it probably won’t ever get you rich.
The bigger motivational factor should be to do it because you can. There is only one place to start in learning to work with FPGA’s and create cool and interesting projects. My vote is to start off with the basics, learn to work with a basic FPGA, learn the algorithms involved that have the potential of making you some digital cash, and most importantly have fun while you’re doing it!
LOGi Family Bitcoin mining Application
The FPGA LOGi family has support for a bitcoin mining application that will get you up and running with a fully operational bitcoin miner in 10 cubic inches of hardware. The current hardware supported is the LOGi-bone in conjunction with the Beaglebone. You can simply extract and run the packaged application code or open and explore the open source project yourself, learn it, make modifications and then build and run your own custom version. After getting the application running, don’t forget to sit back and think, I just created my own bitcoin mining rig!
This mining project is based upon an existing open source hardware project that was customized and built to work on the LOGi family and Beaglebone. The project was created by Jonathan Piat. The LOGi team looks forward to porting the project to run on the LOGi-Mark1 and allow interfacing the Beaglebone, Raspberry Pi. When you are finished with the bitcoin minig project, don't throw out the board move onto the many other cool projects that the LOGi Family boards are capable of running, such as plug and play machine vision, Quadcopter, autonomous robot and many more. The LOGI team plans to continue working to make these projects as plug and play as possible, as was done with the mining application.
Running the Demo:
This demo shows how one can build a low power self contained mining platform using a Beaglebone and the Logibone cape. In this demo the Beaglebone executes a python client that Communicates with the mining pool to get share information and submit hashing results. A python class provides the interface to the Logibone to easily get/send information from/to the FPGA. The Logibone cape uses the GPMC interface of the Beaglebone and thus appear in the Beaglebone address space as a set of registers. These register provides information about the hashing status and an interface to write the share and read the result.
To run the demo:
1) Extract the logibone_mining_demo.tar.gz file to the beaglebone
2) Extract the tar.gz file (tar xzf logibone_mining_demo.tar.gz)
3) Go into the logibone_mining_demo folder
4) Add execution mode to the make_demo.sh script (chmod 777 make_demo.sh)
5) If you are running Ubuntu, edit make_demo to uncomment the “apt-get” lines and
comment the “opkg” lines (by default the demo runs on Angstrom)
6) Execute make_demo and follow the instruction (executing the script should take 2
minutes and the cape Led should be blinking)
Note: You will need to configure each mining worker to participate in a bitcoin mining pool You be given worker registration information username and password for each worker that can be used to configure your mining worker. There are many mining pool sites which can be referenced here: http://mining.bitcoin.cz/
References and Resources:
LOGi Family overview and documentation
FPGA LOGi family overview Document
Video Overview of FPGA LOGi family and LOGi-Bone
Source Code repository containing the bitcoin miner and other projects:
Jonathan Piat Repository
Current Bitcoin Mining Source package to install and run for LOGi-Bone and Beaglebone:
http://valentfx.com/images/prj/logi/demo/logibone_mining_demo.tar.gz
Other projects coming for the LOGi Family:
FPGA LOGi Guides - Tutorials - Applications
References and further reading:
[1] https://en.bitcoin.it
[2] http://en.wikipedia.org/wiki/Bitcoin
http://www.npr.org/blogs/money/2011/08/24/138673630/what-is-bitcoin
http://codinginmysleep.com/bitcoin-mining-in-plain-english/
I am looking for individuals that would be interested in being a beta tester for the FPGA MARK-1. The FPGA MARK-1 is a highly configurable FPGA platform that is intended to be used as an independent FPGA development board or as an add-on (shield) to existing embedded platforms. The platforms that the MARK-1 is intended to interface with are: 1) Arduino; 2) Raspberry Pi; and 3) Beagle Bone. (See link to the FPGA MARK-1 project page for more details on the design.)
I took some working prototypes to Maker Faire New York to see what people thought and to get feedback on changes that users would like to see. I have made some changes including adding interfacing options for the Raspberry Pi and Beaglebone and have added a high speed data port for high bandwidth applications such as SDR (Software Defined Radio), high speed ADC, video, etc. I am going to be fabricating Beta boards with the changes and would like to have them tested for any required changes before going to production.
I need Beta testers that are proficient in working with the Raspberry Pi, Beaglebone or Arduino. The users need to have some experience in working FPGA’s. I would like the users to experiment with the FPGA Mark-1 interfacing options to one of the listed platforms, get some code examples running on the interfacing platform, and give me feedback on any errors in the design or changes that they would like to see based on their experience. I will supply the users with the FPGA MARK-1 Beta boards and give them a final production unit once fabricated.
I would like to see some existing projects that the users have developed to show that they are proficient in working with one of the listed platforms. I would also like see some FPGA work to show me that they have some experience in working FPGA’s. Please email with these items and I will talk to you further about being a Beta tester.
I would be happy to hear from anyone that may have an opinion, insight or suggestion that they would like to share.
Michael Jones
We need your support!
Please support the LOGI-BONE design which is entered into the beaglebone cape contest. We are hoping to place in the top 3 in order to get these boards into the hands of distributors and out the door to YOU! You can support by clicking "like" for facebook , +1 for google plus and or tweet the link. Thanks for your support!

